
17 Halloween Snacks for Kids That Are Simple, Fun, and Festive
Halloween snacks for kids can be playful, colorful, and delicious without requiring complicated decorating skills or hours in the kitchen. Whether you’re preparing a classroom party, planning a Halloween movie night, or putting together a festive after-school treat, a few creative ingredients can turn everyday foods into little ghosts, monsters, pumpkins, and spiders.
These 17 Halloween snacks for kids include a mix of fresh fruit, crunchy bites, cheesy favorites, and sweet treats. Many use familiar ingredients that children already enjoy, making them practical choices for busy parents who want something festive without an elaborate baking project. You’ll find no-bake ideas for quick preparation, warm snacks for cozy October evenings, and colorful party foods that look great on a Halloween platter.
Each idea includes ingredients, simple instructions, and practical tips to help you recreate the finished snack. You can also adjust the decorations, serving sizes, and flavors to suit your family or event. For younger children, prepare small pieces appropriately and supervise eating, especially when serving foods that may present choking hazards.
1. Banana Ghosts
Banana ghosts are a simple, no-bake Halloween snack with a playful appearance and a naturally sweet flavor. Halved bananas become little ghosts with just a few chocolate details, so this is an easy activity for children who enjoy helping in the kitchen.
Serve them chilled on a white platter for a clean, ghostly look. They’re best prepared shortly before serving because cut bananas gradually brown when exposed to air.

Ingredients
- 3 firm ripe bananas
- 2 tablespoons mini chocolate chips
- 1 teaspoon melted chocolate, if needed for decorating
How to Make
- Peel the bananas and cut each one crosswise in half.
- Stand each half upright on its flat end.
- Press two mini chocolate chips into the upper portion of each banana to make eyes.
- Add a small chocolate mouth using a mini chip or a toothpick dipped in melted chocolate.
- Arrange on a platter and refrigerate briefly before serving.
Tips
- Choose firm bananas so the ghosts hold their shape.
- Add the faces just before serving for the freshest appearance.
- For easier decorating, use melted chocolate applied with a clean toothpick.
- Keep the platter chilled until snack time.
2. Apple Monster Mouths
Apple monster mouths turn crisp apple slices into funny Halloween creatures with big grins. A thin layer of creamy sunflower seed butter or smooth nut butter helps hold the filling together, while small strawberry pieces create playful tongues.
The contrasting red apple skin and pale filling make these snacks colorful enough for a party platter. Use thin apple wedges and keep the filling layer modest so the bites are easier to handle.

Ingredients
- 2 medium red apples
- 3 tablespoons smooth sunflower seed butter
- 2 fresh strawberries
- 1 small slice mild white cheese
How to Make
- Wash the apples, remove the cores, and cut them into 16 thin wedges.
- Slice the strawberries into short, thin strips.
- Cut the cheese into small triangular pieces.
- Spread a thin layer of sunflower seed butter on one side of eight apple wedges.
- Add a strawberry strip and a few cheese triangles, then top with the remaining wedges to form mouths.
- Arrange on a platter and serve promptly.
Tips
- Use lemon juice sparingly on cut apples if you need to prepare them a little ahead.
- Check school or party allergy rules before using seed or nut spreads.
- Make the cheese pieces small and avoid hard toothpicks or decorative picks.
- Keep the filling thin to help the mouths stay together.
3. Clementine Pumpkins
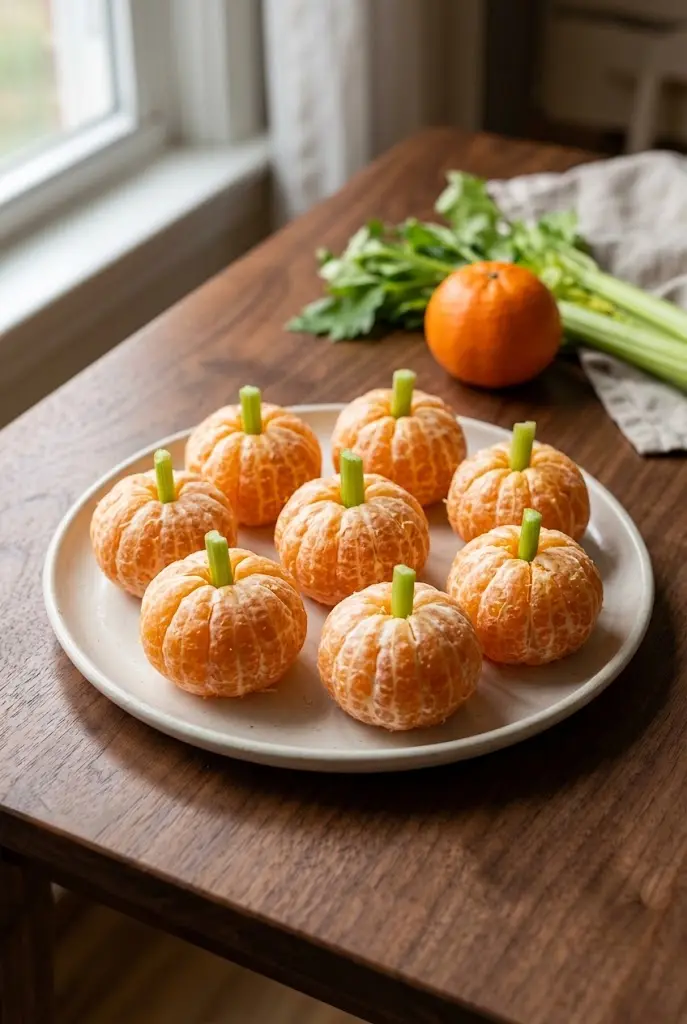
Clementine pumpkins are one of the easiest Halloween snacks to assemble. Small, peeled clementines resemble miniature pumpkins, and a short piece of celery in the center creates a simple green stem.
Their bright orange color brings a cheerful touch to a Halloween table, while the fresh fruit offers a refreshing alternative to richer party treats. These are especially useful when you need a snack that can be prepared in just a few minutes.
Ingredients
- 8 clementines
- 1 small celery stalk
How to Make
- Peel the clementines carefully, keeping the fruit intact.
- Wash the celery and cut it into eight short, narrow pieces.
- Insert one celery piece into the top center of each clementine.
- Arrange on a serving plate and refrigerate until ready to serve.
Tips
- Choose firm clementines that are easy to peel without breaking apart.
- Cut celery stems short so they stay in place.
- Assemble shortly before serving for the neatest presentation.
- Serve with other fresh fruit for a colorful snack board.
4. Pretzel Broomsticks
Pretzel broomsticks bring a little Halloween magic to a savory snack platter. Pretzel rods become broom handles, while thin cheese strips tied around one end create the bristles.
They require only a few ingredients and no cooking, making them a good option for a last-minute party. Mild cheddar or mozzarella-style cheese works well because it can be cut into narrow strips without crumbling too much.

Ingredients
- 8 thin pretzel rods
- 4 slices mild cheddar cheese
- 8 short pieces of fresh chive, optional
How to Make
- Cut each cheese slice into several narrow strips, leaving one end attached if possible.
- Wrap the cheese strips around the bottom 1 inch of a pretzel rod.
- Press gently to help the cheese stay in place.
- Tie a short chive around the cheese bundle if desired.
- Arrange the broomsticks on a board and serve.
Tips
- Use chilled cheese for cleaner cuts.
- Avoid soaking the cheese or pretzels in moisture, which can soften the snack.
- If chives break, leave them out rather than forcing a tight knot.
- Keep pretzel broomsticks away from very young children who may struggle with hard, crunchy foods.
5. Mummy Pizza Toasts
Mummy pizza toasts combine familiar pizza flavors with a fun Halloween design. Small bread slices are topped with pizza sauce, strips of mozzarella cheese, and olive eyes to create a row of little mummies.
They’re ideal for a warm after-school snack or a children’s Halloween gathering. The cheese melts quickly, so keep an eye on the oven and remove the toasts once the bread is crisp and the cheese is bubbling.

Ingredients
- 6 small slices of bread
- ⅓ cup pizza sauce
- 6 ounces mozzarella cheese, cut into thin strips
- 6 black olives, sliced
- 1 teaspoon olive oil, optional
How to Make
- Heat the oven to 400°F (205°C).
- Arrange the bread on a baking sheet and lightly brush with olive oil if desired.
- Spread a thin layer of pizza sauce over each slice.
- Arrange mozzarella strips in overlapping bands, leaving a small space near the top for the eyes.
- Add two olive pieces to each toast.
- Bake for about 7–10 minutes, until the bread is crisp and the cheese has melted. Cool slightly before serving.
Tips
- Cut the cheese into uneven strips for a more convincing mummy effect.
- Use small bread rounds or mini naan pieces for bite-size portions.
- Add finely chopped bell pepper beneath the cheese for extra flavor.
- Let the toasts cool enough for children to handle safely.
6. Halloween Cheese Pumpkins
Cheese pumpkins are savory little bites that look festive without requiring complicated shaping. Mild cheddar mixed with a small amount of cream cheese forms a soft mixture that can be rolled into miniature pumpkin shapes.
A tiny piece of celery or chive can serve as the stem. Serve the pumpkins with crackers and sliced vegetables for a party platter that balances crunchy and creamy textures.
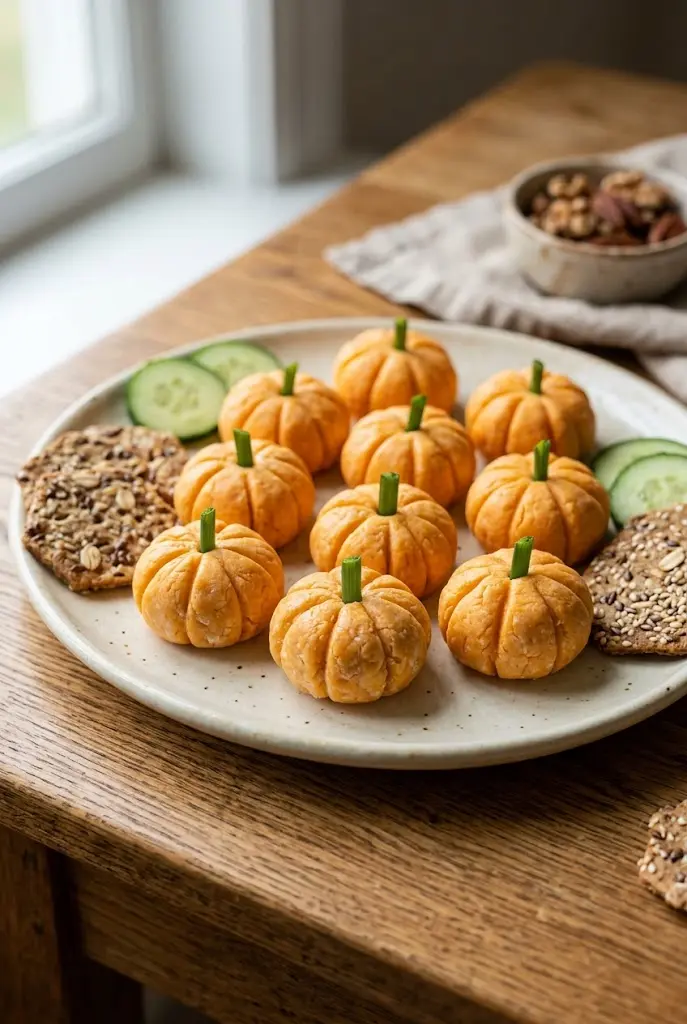
Ingredients
- 8 ounces finely shredded mild cheddar cheese
- 4 ounces softened cream cheese
- ¼ teaspoon paprika, optional
- 2 tablespoons finely chopped chives, optional
- Small celery pieces or chive lengths for stems
How to Make
- Mix the cheddar and cream cheese until evenly combined.
- Add paprika and chives if desired.
- Refrigerate for 20–30 minutes, until firm enough to shape.
- Roll the mixture into 10 small balls.
- Use the back of a butter knife or a toothpick to press shallow vertical grooves into each ball.
- Add a tiny green stem to the top of each pumpkin and chill until serving.
Tips
- Finely shredded cheese gives the mixture a more even texture.
- Chill the mixture before shaping to reduce sticking.
- Keep the pumpkins small enough for easy serving.
- Refrigerate leftovers promptly in a covered container.
7. Strawberry Ghosts
Strawberry ghosts offer a sweet, colorful addition to a Halloween dessert table. Fresh strawberries dipped in melted white chocolate become little ghosts with a few dark chocolate details.
Choose dry, firm berries so the coating adheres well. These treats look especially appealing when arranged on a simple platter with enough space between them to show their shapes.
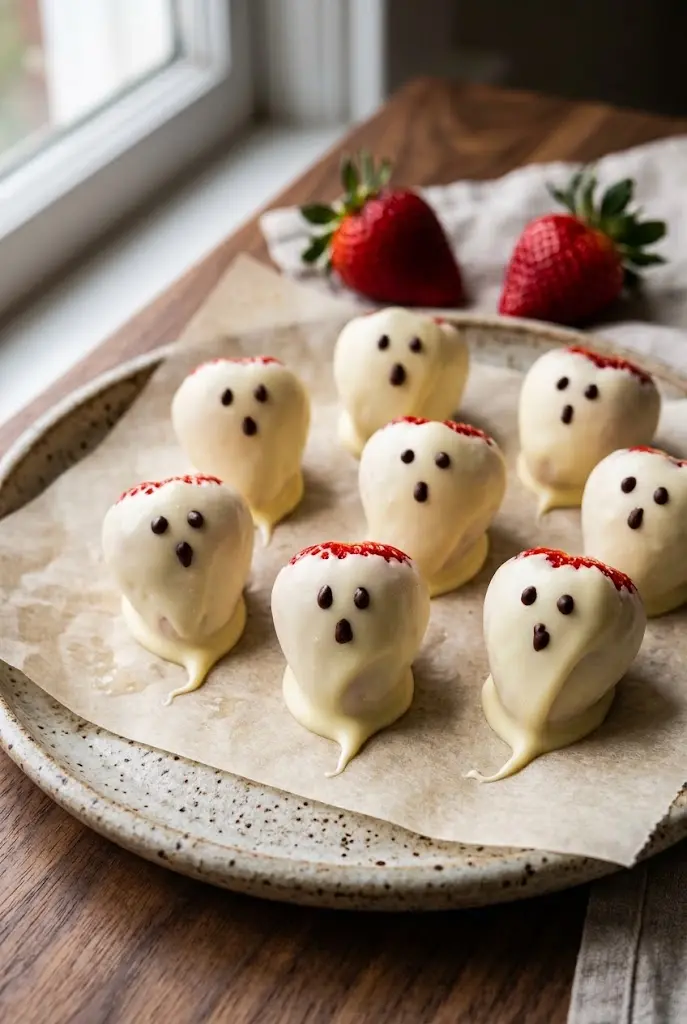
Ingredients
- 12 medium strawberries
- 8 ounces white chocolate chips
- 1 teaspoon neutral vegetable oil, optional
- 2 tablespoons mini dark chocolate chips
How to Make
- Wash the strawberries and dry them completely. Remove the leafy tops.
- Melt the white chocolate in a microwave-safe bowl in short intervals, stirring between each.
- Stir in the oil if needed to loosen the coating.
- Dip each strawberry into the melted chocolate and place it on parchment paper.
- Before the coating fully sets, add tiny dark chocolate eyes and mouths.
- Let the chocolate firm at cool room temperature or refrigerate briefly.
Tips
- Dry the berries thoroughly; moisture can make melted chocolate seize.
- Melt the chocolate gently to prevent scorching.
- Use a toothpick to position the small facial details.
- For the best texture, serve the same day and avoid leaving the berries in a warm room for long periods.
8. Monster Popcorn Cups
Monster popcorn cups are a colorful way to serve a familiar snack at a Halloween movie night. Popcorn can be portioned into paper cups decorated with monster faces, making serving simple and reducing the need for a large communal bowl.
Use plain popped popcorn and add a small amount of melted butter and seasoning if desired. Keep the decorations on the outside of the cups rather than mixing non-edible craft materials into the food.
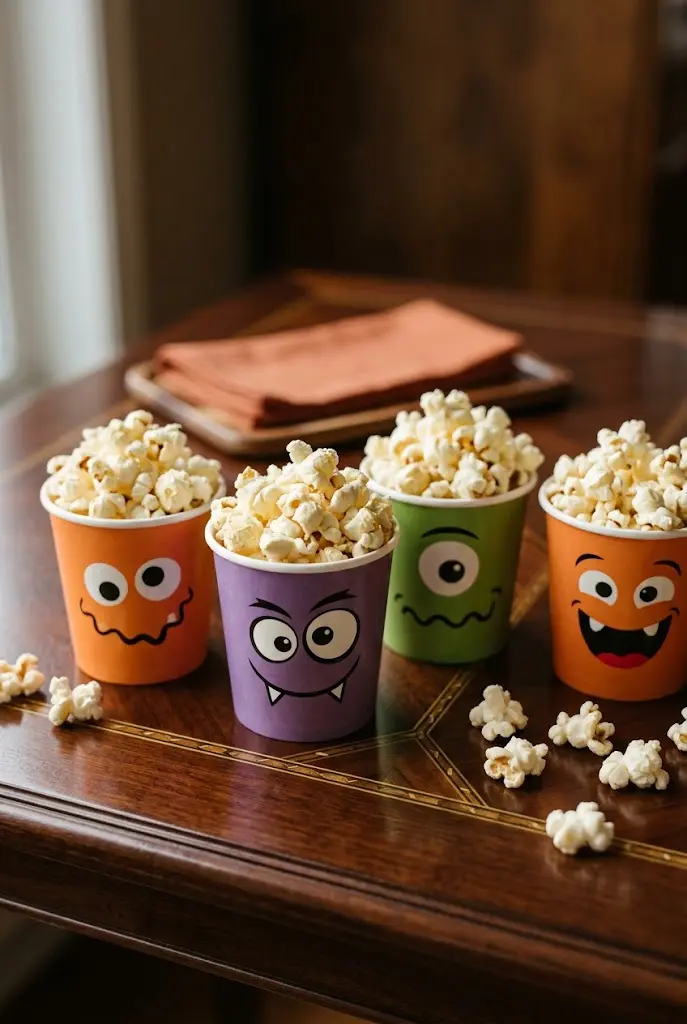
Ingredients
- 8 cups freshly popped plain popcorn
- 1 tablespoon melted butter, optional
- A small pinch of salt, optional
- 4 clean Halloween-themed paper cups
How to Make
- Prepare the popcorn according to the package directions or using your preferred popping method.
- Remove any unpopped kernels.
- Toss with melted butter and a little salt if desired.
- Divide the popcorn among four cups.
- Arrange the cups on a serving tray just before the party begins.
Tips
- Check every portion for hard unpopped kernels before serving.
- For younger children, choose a more age-appropriate snack because popcorn can be a choking hazard.
- Use clean food-safe cups and keep decorations outside.
- Make smaller portions so the popcorn stays fresh and crisp.
9. Pumpkin Quesadilla Triangles
Pumpkin quesadillas are a warm, savory Halloween snack made with tortillas and melted cheese. Cutting small pumpkin faces into the top tortilla before heating creates a festive look as the cheese melts underneath.
They work well for a family dinner appetizer or a party spread with mild salsa on the side. Use a small amount of cheese so the tortillas remain easy to cut and serve.
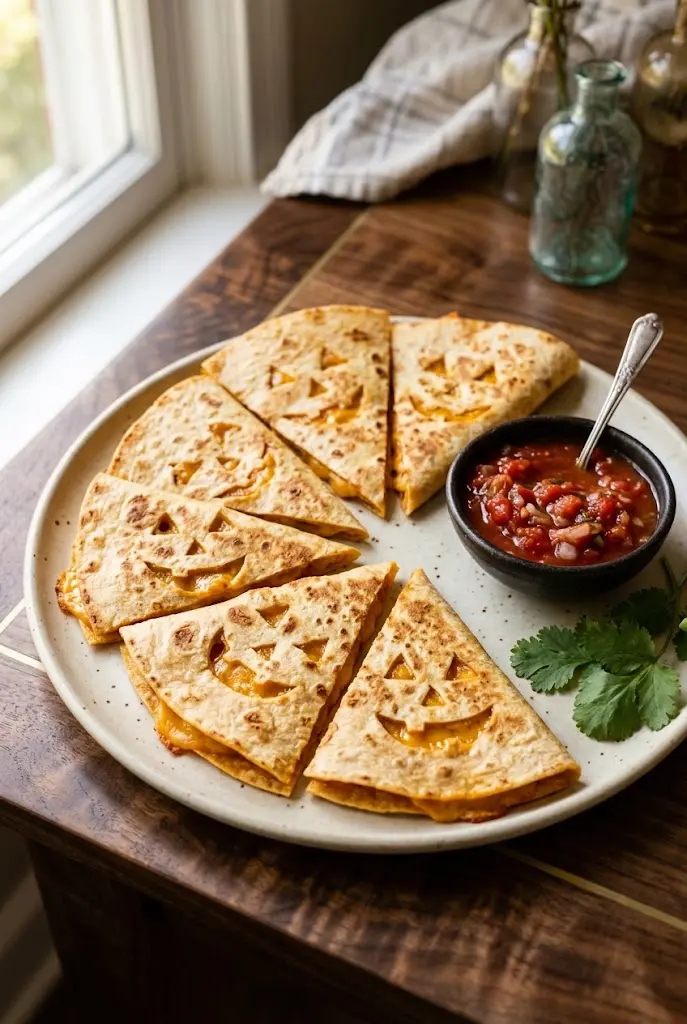
Ingredients
- 4 medium flour tortillas
- 1 cup shredded cheddar or Monterey Jack cheese
- 1 teaspoon olive oil
- ¼ cup mild salsa, for serving, optional
How to Make
- Use a small knife to cut simple pumpkin faces into two tortillas.
- Sprinkle the shredded cheese evenly over the other two tortillas.
- Place the cut tortillas on top, aligning the edges.
- Heat a lightly oiled skillet over medium-low heat.
- Cook each quesadilla for about 2–3 minutes per side, until golden and the cheese melts.
- Cool briefly, cut into triangles, and serve with mild salsa if desired.
Tips
- Keep the pumpkin-face openings large enough to remain visible after cooking.
- Use medium-low heat so the tortilla browns before the cheese burns.
- Let the quesadillas rest for a minute before cutting.
- Offer salsa separately to help the tortillas stay crisp.
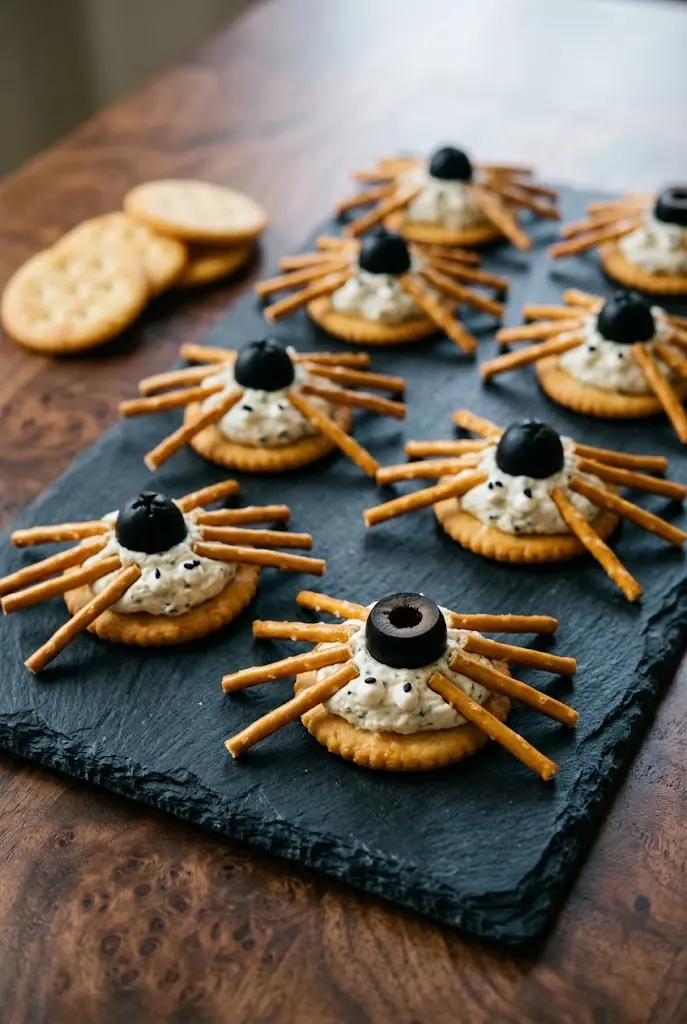
10. Spider Cracker Bites
Spider cracker bites are tiny savory snacks made with round crackers, a creamy cheese filling, and pretzel-stick legs. They’re easy to assemble in batches and fit neatly on a Halloween snack board.
Use a firm filling that helps the pretzels stay in place. Assemble them shortly before serving because pretzel sticks can soften when they sit against moist fillings for too long.
Ingredients
- 16 round crackers
- 4 ounces softened cream cheese
- 2 tablespoons finely shredded cheddar cheese
- 32 short pretzel-stick pieces
- 8 small black olive pieces, optional
How to Make
- Mix the cream cheese and shredded cheddar until smooth.
- Spread a small amount of the mixture on eight crackers.
- Press four pretzel pieces into each side of the filling to form eight legs per spider.
- Top with the remaining crackers or a small olive piece, depending on the design you prefer.
- Add tiny olive details if desired and serve promptly.
Tips
- Break the pretzels into similar lengths for a balanced appearance.
- Keep the filling small enough to prevent the crackers from sliding.
- Assemble close to serving time to maintain crunch.
- Avoid hard pretzel pieces for children who are too young to manage crunchy foods safely.
11. Halloween Veggie Skeleton
A veggie skeleton makes fresh vegetables more appealing by arranging them into a funny skeleton shape. Cucumber rounds, carrot sticks, bell pepper strips, and cauliflower florets can create the ribs, arms, legs, and feet, while a small bowl of dip serves as the head.
This is a useful centerpiece for a party table because it adds color and gives children several familiar vegetables to choose from. Use a large, clean platter and keep the vegetables cut into manageable pieces.

Ingredients
- 2 medium carrots
- 1 cucumber
- 1 red bell pepper
- 1 cup cauliflower florets
- ½ cup ranch-style dip
- 2 small black olive slices
How to Make
- Wash all vegetables thoroughly.
- Cut the carrots into sticks, cucumber into rounds, and bell pepper into strips.
- Place the dip bowl at the top of a large platter.
- Arrange carrot sticks as the arms and legs.
- Use cucumber and bell pepper pieces to form the ribs and torso.
- Add cauliflower florets as hands and feet, then place the olive slices on the dip as eyes.
- Refrigerate until serving.
Tips
- Choose vegetables with contrasting colors for a more recognizable skeleton.
- Keep the dip in a separate bowl to prevent the vegetables from becoming soggy.
- Prepare the platter shortly before serving for the best crunch.
- Cut raw vegetables appropriately for the age of the children attending.
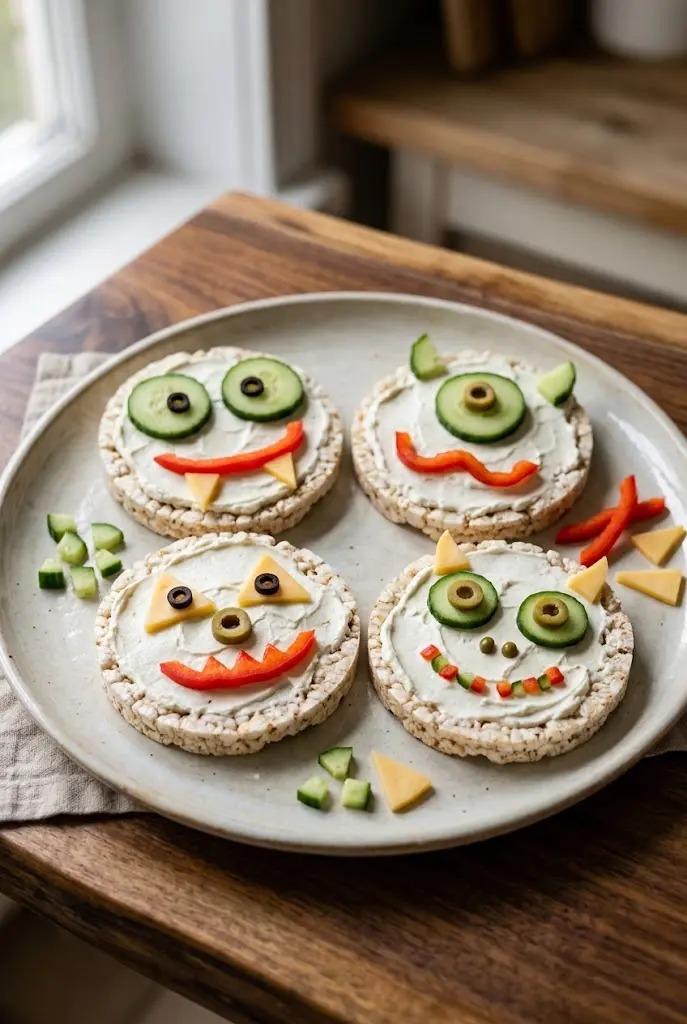
12. Monster Rice Cakes
Monster rice cakes are a quick, customizable snack that children can decorate with colorful toppings. A rice cake becomes the monster’s face, while a thin layer of cream cheese and strips of bell pepper, cucumber, or olive pieces create eyes, hair, and silly expressions.
They’re ideal for families who prefer a less sugary snack. Let children design their own monsters with a small selection of pre-cut toppings.
Ingredients
- 4 plain rice cakes
- 4 tablespoons cream cheese
- ½ cucumber
- ½ red bell pepper
- 4 black olive slices
- 1 slice mild cheddar cheese
How to Make
- Spread each rice cake with a thin layer of cream cheese.
- Slice the cucumber into small rounds.
- Cut the bell pepper into narrow strips and the cheese into small triangles.
- Arrange the vegetables, olives, and cheese to create different monster faces.
- Serve immediately to preserve the rice cakes’ crisp texture.
Tips
- Use only a small amount of spread so the rice cakes remain crunchy.
- Prepare toppings in separate bowls for a simple decorating activity.
- Choose soft, manageable toppings for younger children.
- Assemble shortly before eating because moisture softens rice cakes.
13. Graveyard Chocolate Pudding Cups
Graveyard pudding cups bring a classic Halloween scene to dessert. Chocolate pudding forms the base, crushed chocolate cookies create soil, and a simple cookie standing upright becomes a tombstone.
These individual portions are useful for parties because they’re easy to distribute and can be prepared ahead. Keep the decorations simple and use cookies that fit securely into the pudding without falling over.

Ingredients
- 2 cups prepared chocolate pudding, chilled
- 8 chocolate sandwich cookies
- 3 rectangular plain cookies
- 3 small mint leaves, optional
How to Make
- Divide the chilled chocolate pudding among three small serving cups.
- Crush the chocolate sandwich cookies into fine crumbs.
- Spoon a layer of crumbs over each pudding cup.
- Insert one rectangular cookie upright into each cup.
- Add a small mint leaf near the cookie if desired.
- Refrigerate until serving.
Tips
- Assemble the cups a short time before serving so the cookie crumbs retain some texture.
- Use sturdy cookies that can stand upright in the pudding.
- Keep the pudding chilled according to its preparation instructions.
- For a less sweet version, use plain chocolate pudding and reduce the cookie topping.
14. Mummy Sausage Rolls
Mummy sausage rolls are a warm, savory Halloween snack made with thin pastry strips wrapped around small beef or turkey sausages. Once baked, two tiny edible eyes complete the mummy look.
They work well for an afternoon party or as a warm addition to a larger snack spread. Choose sausages with a suitable ingredient list and cook them according to their package directions and the pastry’s baking requirements.

Ingredients
- 1 sheet puff pastry, thawed
- 8 small beef or turkey cocktail sausages
- 1 egg, beaten
- 16 tiny edible candy eyes or small edible decorations suitable for the recipe
- ¼ cup tomato sauce, optional
How to Make
- Heat the oven to the temperature specified on the puff pastry package, commonly around 400°F (205°C).
- Cut the pastry into thin strips.
- Wrap each sausage with overlapping pastry strips, leaving a small space near one end.
- Place on a parchment-lined baking tray and brush lightly with beaten egg.
- Bake according to the pastry package directions until puffed and golden and the sausages are thoroughly heated.
- Cool slightly, add the edible eyes securely, and serve with tomato sauce if desired.
Tips
- Keep the pastry cool while wrapping for easier handling.
- Leave small gaps between pastry strips for a bandaged appearance.
- Follow the sausage package instructions for safe heating.
- Let the rolls cool before serving to children, as the centers can remain hot.
15. Cheese and Cracker Pumpkin Faces
Cheese and cracker pumpkin faces are an easy no-bake snack for children who enjoy assembling their own food. Orange cheese slices or small cheese rounds become pumpkins, while crackers and tiny pieces of vegetables add eyes, noses, and grins.
They’re useful for a party table because each child can choose a different face. Prepare the pieces in advance, then let everyone build a snack on their own plate.

Ingredients
- 8 round crackers
- 4 slices cheddar cheese
- 4 black olive slices
- ¼ red bell pepper
- 4 short chive pieces
How to Make
- Cut the cheddar into small rounds or pumpkin-like shapes.
- Slice the olives into small pieces for eyes.
- Cut the bell pepper into tiny strips for mouths.
- Place one cheese shape on each cracker.
- Add the olive eyes, pepper mouth, and chive stem.
- Arrange on a platter and serve immediately.
Tips
- Use a small cookie cutter for consistent cheese shapes.
- Keep the decorations small so they stay on the cheese.
- Assemble shortly before serving to maintain cracker crispness.
- Offer the toppings separately if children would enjoy making their own designs.
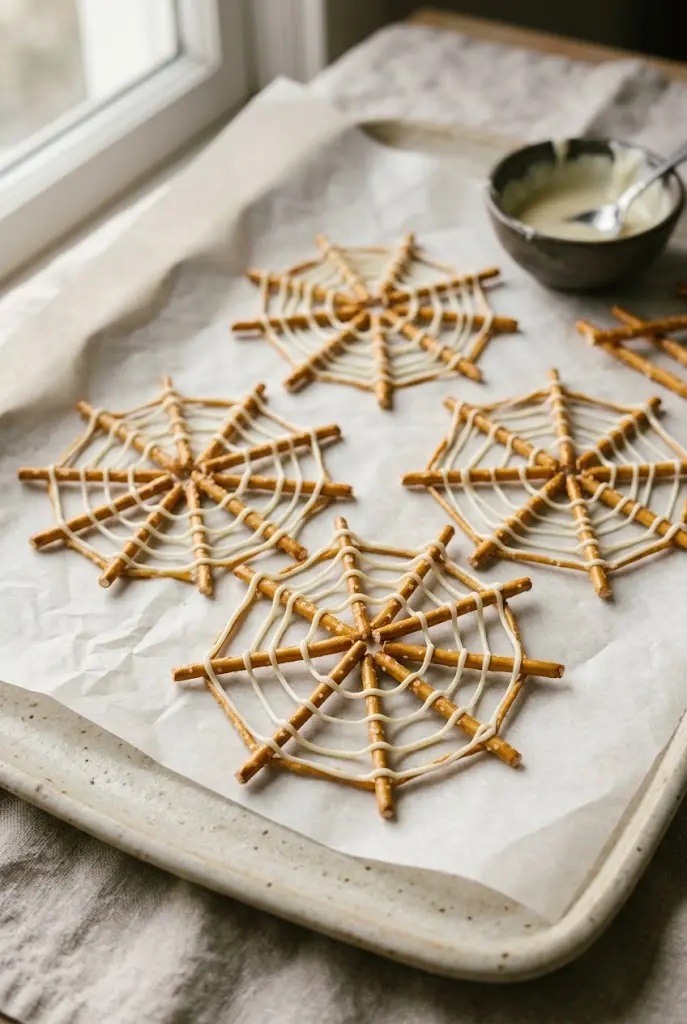
16. Pretzel Spiderwebs
Pretzel spiderwebs are a crunchy Halloween snack that doubles as a sweet party treat. Thin pretzel sticks are arranged in a web pattern and joined with melted white chocolate, creating delicate edible webs that can be served individually.
Allow the chocolate to set fully before moving the webs. Because the finished shapes are fragile, place them on a flat platter rather than stacking them.
Ingredients
- 32 thin pretzel sticks
- ½ cup white chocolate chips
- 1 teaspoon neutral vegetable oil, optional
How to Make
- Line a flat tray with parchment paper.
- Melt the white chocolate gently, stirring until smooth.
- Arrange eight pretzel sticks in a radial pattern to form each web.
- Transfer the melted chocolate to a small piping bag or a clean zip-top bag with a tiny corner snipped off.
- Pipe thin chocolate lines between the pretzels to connect them into a web.
- Let the chocolate set completely before carefully lifting the webs from the parchment.
Tips
- Keep the chocolate warm enough to pipe but not hot.
- Make the connecting lines slightly thicker where pretzels meet.
- Work on a flat surface so the webs do not slide.
- Store in a cool, dry place in a single layer.
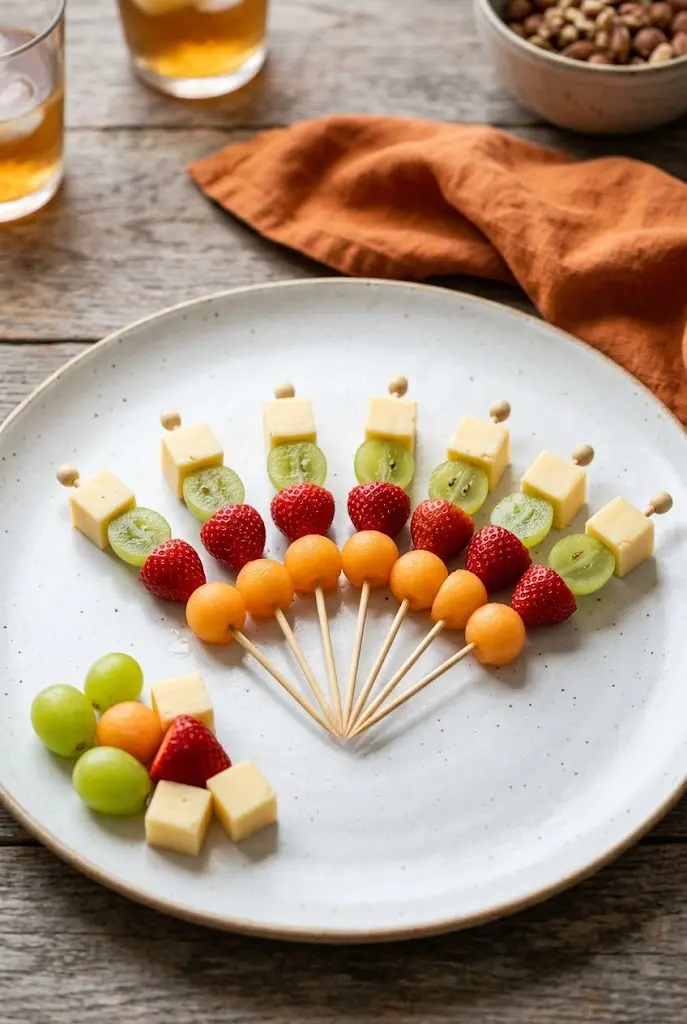
17. Halloween Fruit and Cheese Skewers
Halloween fruit and cheese skewers bring several colors and flavors together in one easy-to-serve snack. Orange melon, grapes, strawberries, and small cheese cubes can be arranged in repeating patterns for a festive platter.
Use short, food-safe picks only when suitable for the children attending, and consider serving the ingredients loose for younger guests. The fruit and cheese can also be arranged in a pumpkin-shaped pattern on a platter for a pick-free option.
Ingredients
- 1 cup orange melon cubes or balls
- 1 cup strawberries, cut into suitable pieces
- 1 cup grapes, prepared safely for the age of the children
- 6 ounces mild cheddar cheese, cut into cubes
- 8 short food-safe picks, optional
How to Make
- Wash the fruit thoroughly and prepare it into appropriately sized pieces.
- Cut the cheese into small cubes.
- Thread the fruit and cheese onto short food-safe picks, alternating colors.
- Arrange the skewers on a platter.
- Alternatively, arrange the ingredients directly on a platter in a pumpkin or Halloween color pattern without using picks.
- Refrigerate until serving.
Tips
- Prepare the fruit shortly before serving for the freshest appearance.
- Cut grapes lengthwise into quarters for young children and follow age-appropriate choking-prevention guidance.
- Skip skewers for younger children and serve the ingredients in small bowls instead.
- Keep the platter chilled until snack time.